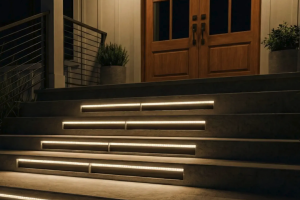
You’re looking to make your stairs safer and more convenient, and sensor lights are a fantastic way to do that without a major overhaul. The good news is, installing stair sensor lights is generally quite straightforward, even for those who aren’t seasoned DIYers. Most systems are designed for ease of use, often involving adhesive mounting, simple wiring for low-voltage options, or plug-and-play functionality. With a bit of planning and the right tools, you can illuminate your steps for safer navigation in no time.
Understanding Your Sensor Light Options
Before you grab any lights, it’s helpful to understand the different types available. This will heavily influence your installation approach and the overall outcome. Thinking about power sources, how they detect movement, and their physical design will help you pick the best fit for your home.
Powering Your Stair Lights
The power source is a big differentiator in terms of installation complexity. You’ll typically find three main types.
Battery-Powered Lights
These are by far the easiest to install. They require no wiring at all, making them ideal for renters or anyone who wants a truly commitment-free setup. You simply stick them where you need them or use included magnetic mounts. The downside, of course, is that you’ll need to replace batteries periodically. Consider rechargeable batteries to offset waste and cost. Look for models with long battery life and easy battery access.
USB Rechargeable Lights
A step up from standard battery-powered, these lights offer the convenience of no permanent wiring but can be recharged via a USB cable. This eliminates the need to constantly buy new batteries. Installation is similar to regular battery lights – usually adhesive or magnetic. The main consideration here is remembering to take them down to recharge, or having accessible power outlets if you opt for models that can charge in place.
Hardwired (Low Voltage) Lights
These offer a more permanent and often more aesthetically pleasing solution. They connect to a low-voltage power supply, usually a transformer that plugs into a standard wall outlet. While this involves running wires, it’s generally a low-risk electrical project because it’s low voltage. You won’t be dealing with mains electricity directly for the lights themselves. This option provides consistent power, so no battery changes, and often allows for more synchronized lighting effects across multiple steps. The wires can often be hidden under stair nosings, along baseboards, or within wall cavities, making for a very clean look.
Hardwired (Mains Voltage) Lights
This is the most complex option and usually requires an electrician. These lights connect directly to your home’s main electrical circuit. They are typically recessed into walls or risers and are a permanent fixture. While they offer the most robust and seamless integration, the installation cost and effort are significantly higher. For the purpose of ‘easy installation,’ we’ll largely focus on the other three types.
Types of Motion Sensors
The ‘sensor’ part of sensor lights is crucial. How they detect motion directly impacts their effectiveness and how you position them.
Passive Infrared (PIR) Sensors
PIR sensors are the most common type for stair lights. They detect changes in infrared radiation, which is emitted by body heat. When a warm body moves into the sensor’s field of view, it triggers the light. These are generally reliable and energy-efficient. Their detection range and angle are important specifications to check. You want a sensor that can reliably pick up movement at both the top and bottom of your stairs, covering the entire path.
Microwave Sensors
Less common for simple stair lights but worth noting, microwave sensors emit microwave radiation and detect changes in the reflected signal. They can often detect movement through thin walls or doors, which might be overkill or even undesirable for stair lighting, as it could lead to false triggers. For ease of installation and common applications, PIR sensors are usually preferred.
Light Design and Mounting
The physical design of the lights and how they mount will influence where and how you place them.
Strip Lights
Flexible LED strip lights are very popular for stairs. They can be cut to length and often have adhesive backing, making them easy to install along the underside of stair nosings or recessed into grooves. They provide a continuous, even glow, which can be very effective and aesthetically pleasing.
Puck Lights
These are small, round, individual lights. They can be surface-mounted with adhesive or screws, or recessed into walls or risers. They offer a more spotlit look. Battery-powered puck lights are very common and simple to install.
Bar Lights
Similar to strip lights but often in a rigid housing, bar lights are typically longer and can be mounted discreetly. Many battery-powered options come in a bar format with integrated sensors.
Integrated Sensor Lights
Many stair lights, especially battery and USB rechargeable models, have the motion sensor built directly into the light unit itself. This simplifies installation as there’s only one component to place.
Separate Sensor and Light Systems
For hardwired (low voltage) systems, you might have a separate motion sensor that then triggers a series of lights. This allows for more strategic sensor placement (e.g., at the top and bottom of the stairs only) while the lights are placed on every step. While slightly more involved, it offers greater control.
Planning Your Layout and Placement
A little bit of planning goes a long way to ensure your sensor lights work effectively and look good. Don’t just start sticking lights willy-nilly; take a few moments to visualize the setup.
Assessing Your Staircase
First, consider the specifics of your staircase.
Straight vs. L-Shaped/U-Shaped Stairs
Straight staircases are the easiest. L-shaped or U-shaped stairs with landings will require additional thought for sensor placement to ensure coverage around corners. You might need a sensor at each turn or strategically placed to cover both segments.
Open Risers vs. Closed Risers
Open risers (where you can see through to the floor below) might limit where you can discreetly hide wires for hardwired systems. Closed risers offer more surfaces for mounting and hiding components.
Existing Lighting
Do you have any existing overhead lighting that might interfere or create awkward shadows? Consider how the sensor lights will complement or replace current illumination.
Strategic Sensor Placement
This is probably the most critical part of the planning. The sensor needs to reliably detect movement where people start their journey on the stairs.
Top and Bottom of the Staircase
For most staircases, placing a sensor at the very top and another at the very bottom is sufficient. This ensures detection regardless of whether someone is ascending or descending.
Coverage Area
Test the sensor’s coverage before final mounting. Walk the path a few times. Does it trigger reliably when you approach from different angles? Some sensors have a wider field of view than others. You want it to detect you before you’re already on the first dark step.
Avoiding False Triggers
Consider where pets might walk, or if there’s a nearby door that frequently opens and closes, or even heating vents. You don’t want your lights coming on unnecessarily. Aim the sensor slightly away from these potential false trigger sources if possible.
Ambient Light Sensor
Many modern stair sensor lights include an ambient light sensor. This prevents the lights from turning on during the day when there’s already sufficient natural light. If your chosen lights have this, great! If not, you might want to consider models that do, or manually switch them off during the day if it bothers you.
Light Placement for Optimal Illumination
Where you place the actual light units will affect both safety and aesthetics.
Under the Nosing
This is a very popular and effective placement for strip lights or slim bar lights. Mounted to the underside of the stair nosing (the part of the tread that overhangs the riser), the light shines downward onto the step below. This creates a soft, indirect glow that illuminates the tread and riser, highlighting the step edge without shining directly into your eyes. It also neatly hides the light source.
On the Riser
Puck lights or smaller bar lights can be mounted directly onto the riser (the vertical part of the step). This provides more direct illumination and can be a design feature. Ensure they don’t protrude so far as to become a tripping hazard, especially for recessed options.
Along the Wall
For wider staircases or a more diffuse light, strip lights can be run along the baseboard or handrail, casting light across the steps. This can work well but might not highlight individual step edges as effectively as under-nosing placement.
Number of Lights
For under-nosing or riser placement, you’ll generally want a light on every step for consistent illumination. If using very bright lights, you might skip a step, but this can lead to uneven lighting and potential shadows. For wall-mounted systems, fewer, more powerful lights might suffice.
Essential Tools and Materials
Having the right gear makes any DIY project smoother and less frustrating. You won’t need a massive toolbox for most easy installations.
Basic Tools You’ll Likely Need
Gather these before you start to avoid multiple trips to the garage or hardware store.
Measuring Tape
Crucial for accurately measuring stair width, the length of light strips, and consistent placement of individual lights.
Pencil
For marking placement points for lights, sensors, or mounting holes.
Spirit Level (Optional but Recommended)
Ensures your lights are mounted straight and level, which is important for aesthetics, especially with strip or bar lights.
Cleaning Supplies (Rubbing Alcohol, Cloth)
Absolutely essential for adhesive-backed lights. A clean, grease-free surface ensures the adhesive sticks properly and stays put.
Wire Strippers/Cutters (for Low Voltage Systems)
If you’re dealing with low-voltage wiring, these will be necessary for cutting and stripping wires to connect them to the transformer or between light segments.
Small Screwdriver (for Low Voltage Systems or Screw Mounts)
Some low-voltage connections might use screw terminals, or some light fixtures might use small screws for mounting.
Materials You’ll Likely Need
Beyond the lights themselves, a few other items can be helpful.
The Stair Sensor Lights and Components
Make sure you have all the parts that came in the box: the lights, sensors, power supply/transformer (if applicable), remote controls, and any included mounting hardware (adhesive, screws, clips).
Extra Adhesive Strips or Mounting Tape (Heavy Duty)
The adhesive provided with some lights might not be the strongest, especially on textured or painted surfaces. Having some extra heavy-duty double-sided tape (like 3M VHB tape) on hand can be a lifesaver for secure mounting.
Cable Clips or Ties (for Low Voltage Systems)
To keep wires neatly organized and out of the way, small adhesive-backed cable clips or zip ties are excellent. This prevents wires from dangling and creating a tripping hazard.
Extension Cord (for Testing or Transformer Placement)
Useful for temporarily powering up low-voltage transformers during testing, or if your nearest outlet isn’t right next to your staircase.
Small Step Ladder or Stool
To safely reach the higher steps and upper sensor placements.
Step-by-Step Installation Guides
Now for the practical part. We’ll break down the installation based on the power source, as that’s the biggest determinant of the process.
Installing Battery-Powered or USB Rechargeable Lights
This is the easiest category, often involving minimal tools and effort.
1. Clean the Mounting Surface
This is non-negotiable for adhesive-backed lights. Use rubbing alcohol and a clean cloth to thoroughly clean the area where you plan to mount each light and the sensor. Let it dry completely. Any dust, grease, or grime will compromise the adhesive.
2. Test Sensor Placement
Before removing any adhesive backing, hold the sensor (or light with integrated sensor) in its planned location. Walk up and down the stairs a few times. Does it reliably trigger the lights? Adjust the position slightly if needed to optimize detection and minimize false triggers. For multi-light systems, ensure all lights are connected and working during this test.
3. Mark Light Positions
Using a pencil, lightly mark where each light will go. If installing strip lights under the nosing, measure and mark the center or end points for consistent alignment. For individual pucks or bars, ensure they are evenly spaced. Use your spirit level here for neatness.
4. Mount the Lights
Carefully peel off the adhesive backing (or attach magnetic plates) and press each light firmly into place. Hold for 30 seconds to ensure good adhesion. If using screws, pre-drill small pilot holes before screwing in the lights. For strip lights, unroll and press firmly along the marked line, ensuring it adheres evenly.
5. Mount the Sensors
Once the lights are in place, mount the sensor(s) in the pre-tested locations. Again, press firmly if using adhesive.
6. Final Test
Once everything is mounted, do a final walk-through. Check if the lights come on reliably, stay on for the desired duration (most have adjustable timers), and turn off as expected. If using USB rechargeable lights, note where they’ll need to be periodically unplugged for charging.
Installing Low-Voltage Hardwired Lights (DIY Friendly)
This involves a bit more wiring, but it’s manageable because you’re dealing with safe low voltage. Always unplug the transformer before making any connections.
1. Plan Wire Runs
This is crucial. You want to hide the wires as much as possible for a clean look. Think about running them:
- Under the stair nosings: This is common for strip lights, with small wires dropping down the back of the riser to the next step’s light.
- Along the baseboard: For lights mounted on risers or walls, wires can be run discreetly along the baseboard and secured with cable clips.
- Behind stringers or skirt boards: If accessible, wires can be run behind these structural elements.
- Through very small drilled holes: If you’re comfortable drilling small holes (e.g., in the back of risers), wires can be threaded through.
Map out these runs with your pencil before you cut any wires.
2. Connect Lights to Each Other (if applicable)
Many low-voltage systems use a daisy-chain or parallel wiring method.
- Daisy Chain: One light connects to the next, and so on, back to the power supply.
- Parallel: Each light runs a separate wire back to a central junction or directly to the power supply.
Follow your specific product’s instructions carefully. You’ll likely be stripping small sections of wire and connecting them using screw terminals, quick connectors, or soldering (if you’re advanced).
3. Mount the Lights
Similar to battery lights, clean the surface thoroughly. Mount your strip lights, pucks, or bar lights according to your plan. As you mount each light, guide and secure its wires along your planned run. Use cable clips to hold wires firmly in place, especially under nosings or along baseboards. Ensure no wires are dangling or creating a hazard.
4. Mount and Wire the Sensors
Place your motion sensor(s) in the chosen locations (top and bottom of stairs). Run wires from the sensors back to the main controller or transformer, following your hidden wire plan. Connect the sensor wires according to the product’s wiring diagram.
5. Connect to the Transformer/Power Supply
Bring all the light wires and sensor wires back to the low-voltage transformer or controller. Connect them according to the diagram. Double-check all connections to ensure they are secure and correctly polarized (positive to positive, negative to negative, if applicable).
6. Plug in and Test
Once all connections are made and secured, plug the transformer into a standard wall outlet. Test the system thoroughly. Walk up and down the stairs.
- Do the lights come on consistently?
- Do they stay on for the correct duration?
- Are there any loose connections (lights flickering or not coming on)?
- Are wires secured and hidden?
7. Fine-Tune and Conceal
Adjust sensor sensitivity or light duration settings if available. Go back and ensure all wires are neatly tucked away and secured with clips or tape. The goal is for the wiring to be invisible or at least very discreet.
Troubleshooting Common Issues
Even with careful planning, things don’t always go perfectly. Here are a few common hiccups and what to check.
Lights Not Turning On
- Check power source: Are batteries dead? Is the USB light charged? Is the low-voltage transformer plugged in and receiving power?
- Check connections: For low-voltage, re-examine all wire connections. Are they secure? Is polarity correct?
- Ambient light sensor: Is it too bright in the area? The lights might have an ambient light sensor that’s preventing them from activating.
- Sensor blockage: Is something blocking the sensor’s view? Dust, cobwebs, or even nearby furniture can interfere.
- Sensor range/angle: Is the sensor positioned correctly to detect movement? Try adjusting its angle.
Lights Turning On Too Often (False Triggers)
- Sensor sensitivity: Can you adjust the sensor’s sensitivity down?
- Heat sources: Are there heating vents, fireplaces, or direct sunlight hitting the sensor? PIR sensors detect heat.
- Pets: Is your pet frequently walking by the sensor’s detection zone?
- Movement outside desired area: Is the sensor picking up movement from an adjacent room or outdoor window? Adjust its angle or placement.
Lights Flickering or Uneven Brightness (Low Voltage)
- Loose connections: This is a common culprit. Retrace your wiring and tighten all terminals.
- Insufficient power supply: Is your transformer adequately sized for the total wattage of your lights? If you’ve added too many lights, the transformer might be overloaded.
- Wire gauge: For long runs, thin wires can cause voltage drop, leading to dimming. Ensure you’re using an appropriate wire gauge for the length and load.
Lights Falling Off
- Poor surface prep: Did you thoroughly clean the surface with rubbing alcohol?
- Insufficient adhesive: The included adhesive might not be strong enough for your surface type or the weight of the lights. Try heavier-duty mounting tape (3M VHB is excellent).
- Surface texture: Adhesive struggles on highly textured or porous surfaces like rough concrete or flaking paint. You might need to use screws.
Maintenance and Best Practices
Once your stair sensor lights are installed and working, a little ongoing care will keep them running smoothly for years.
Regular Cleaning
Dust and grime can accumulate on light sensors, potentially reducing their effectiveness. Periodically wipe down the sensor lenses and light covers with a soft, damp cloth. Avoid harsh chemicals that could damage plastic.
Battery Management
For battery-powered lights, establish a schedule for checking or replacing batteries. Consider using rechargeable batteries to reduce waste and long-term costs. If using USB rechargeable lights, make it a habit to recharge them when their brightness starts to dim or before they completely run out.
Wire Inspection (Low Voltage)
If you have a low-voltage hardwired system, occasionally check exposed wires (if any) and connections. Ensure they are still secure, untangled, and haven’t been damaged by pets or foot traffic. Re-secure any loose cable clips.
Adjusting Settings
Over time, your needs might change. You might want the lights to stay on longer or shorter, or adjust sensor sensitivity. Familiarize yourself with any adjustment dials or buttons on your sensor or controller.
Consider a Power Outage Plan
While sensor lights enhance safety, they typically rely on household power (even battery ones eventually need charging). In a prolonged power outage, they won’t work. Consider having a few traditional battery-powered flashlights or lanterns readily available at the top and bottom of your stairs as a backup.
Longevity of LEDs
LEDs are known for their long lifespan, often tens of thousands of hours. This means you likely won’t be replacing the light units themselves for many years. However, the associated electronics (sensors, drivers) can sometimes fail sooner. If one light or section stops working, check its connections first before assuming the LED itself is dead.
By following these tips, you’ll not only achieve a safer and more convenient staircase but also enjoy the process of setting it up. It’s a relatively simple upgrade that makes a significant difference in your home’s functionality and peace of mind.